
by Matthew Russell - Posted 6 years ago
Buon Giiorno! Welcome back to the second part of my favorite blog post yet. It’s me again, I hope you’re surviving another work week.
I am a writer/artist/Editor-N-Chief over here at CryptoComics, but my true passion is writing.
Today, I am going to show all of you how to structure a comic script so that your artist can take it and run with it. Soon, you will have a script that you can seriously be proud of and the artist will understand what is going on.
If you haven’t checked out Part one, now is your chance. Go ahead, I’ll wait.
Ok, since your back, I’ll assume that you have your characters drawn up, your locations set, your plot outlined and everything ready to go. Let’s assume you do.
Just as last time, I will be using Hunter as a basis for this so we don’t get lost.
There are several ways to write comics and format it. Let’s start with the “Marvel Way.”
This term was coined by Stan Lee as he had so many comics to write at any given time, that he couldn’t keep up with all the various artists.
He would meet in a planning meeting and they would decide the story, the major events, and so on. Then the artist would let loose.
After the artist would finish with the pages, it would get turned over back to Stan. What he would do now would be to look at the pages and write the story based on what was turned in. He would adjust his dialog to be able to tell a cohesive story based on what was already done.
Although this is rather fun to do as an experiment, I wouldn’t recommend this for your dream projects.
It is always interesting to see what writers will come up with so I am giving you the opportunity to do just that. In the link below, you will be able to download the first issue of Hero’s Story. I have stripped out all the dialog. Let’s see what you can come up with.
Rules:
Some artists love to be able to take liberties with the comic and others want to know exactly what you expect. This will come with experience and collaboration. If you begin with your script and want to find a Penciler later, I suggest going overboard on the detail.
Just like in a movie, some shots need to be visually stunning. This means strange camera angles and action.
With camera angles, there are certain definitions as follows:Close-up (CU) |
This typically is a closer shot from chin to forehead. It is a simple shot to convey facial expressions. |
Extreme Close Up |
This is a close up that will only show one body part such as eyes, or a mouth. Use this sparingly. |
Long shot (LS) |
THink of the team shot. There are more than one character in this panel. This gives the reader a better sense of the surroundings. |
Medium shot (MS) |
THis is the halfway point between a closeup and a long shot. A typical medium shot shows the subject from their head to their waist. This shot helps to indicate some body language. |
POV |
Think; First Person shooter. If a character is interacting with someone else, the other character is looking directly at the reader. |
Eye level |
The most neutral camera angle is the eye-level shot. This will convey objectivity. The artist will need to know the angle if the scene concerns a small child or the direction that the panel is taking. |
Dutch angle |
Take your line of sight and tilt the horizon to convey disorientation. Use this sparingly or the page will take on poor quality. A single panel in a story can be sufficient to convey drunkenness, or a haunting. |
Over-the-Shoulder (OTS) |
This is another angle that can shift a viewer’s perception of the panel. A OTS shot is a close-up of another character’s face from “over the shoulder” of another character and conveys conflict or confrontation. |
This is a hard thing to describe and maintain. There are a few artists that only want to be told the most basic information. Others want to get down and dirty. Keep in mind, this is not used for many comics outside of the action or superhero genre.
My original script for Hunter centered around various combat styles. I tried to use the correct terminology from various fighting styles such as MMA, Jeet Kune Do, Kamishin Ryu, and Aikido. These are all martial arts styles that I am personally familiar with due to my time practicing as a kid, as well as my time in the military (both Marines and US Army).
When I turned it over to an artist, they were stricken with all the knowledge that I was trying to convey. They asked that I change it to the number of panels and “Fight Scene”. I agreed as long as I could add the outcome in another panel at the end. So, I ended up with this:
PAGE SIXTEEN: FOUR PANELS
PANEL 1:
Fight Scene. The Priest hides.
PANEL 2:
Fight Scene.
PANEL 3:
Fight Scene.
PANEL 4:
Fight Scene.
PANEL 1:
Fight Scene.
PAGE SEVENTEEN: FOUR PANELS
PANEL 1:
Fight Scene.
PANEL 2:
Fight Scene.
PANEL 3:
Fight Scene.
PANEL 4:
Fight Scene.
PANEL 1:
Richard is standing over the group. His suit is torn and he looks pissed. The priest is coming out of hiding.
I shortened this for this blog post. It actually lasts for 4 pages due to passing but you get the point.
Yep, as a writer, you have to keep this in mind. An artist will want to know if it is an interior or exterior shot. This will indicate the type of light as well as the amount of light. What time of day is it? Is it nighttime?
All this will play a crucial roll in the artist rendition of your comic. I worked with an artist a long time ago that wanted the lighting source highlighted on a separate line underneath the panel description.
Most times, I have worked it directly into the script that I don’t have an artist lined up already.
Below is an example of such work. In the first 2 panels, I will highlight the lighting. In the last 2, I will explain it in the panel description.
PAGE THREE: FOUR PANELS
PANEL 1:
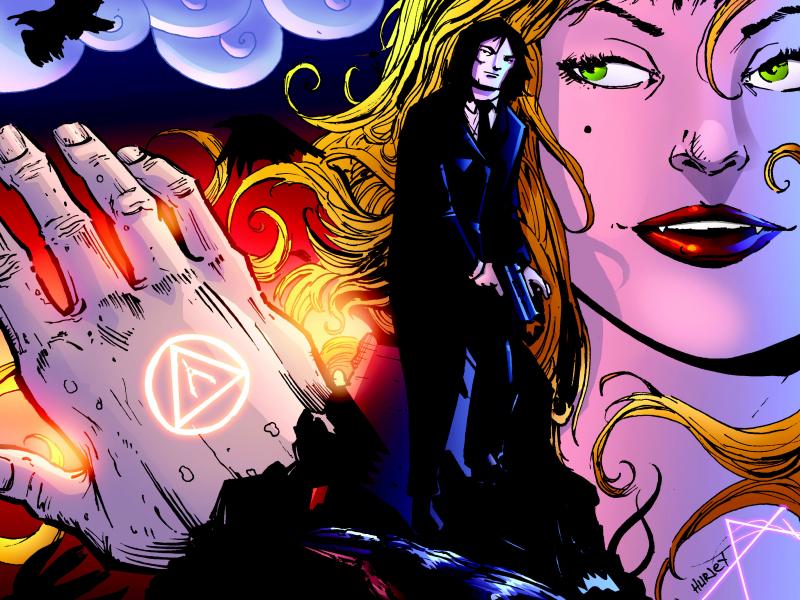
Richard sets the severed hand on the podium in front of him. He has a ring that has the Freemason’s symbol (The compass) with the Star of David and the Egyptian All-Seeing Eye in the middle. The old nasty (partly decomposed) severed hand has a ring on it with a strange symbol.
Lighting: There is a torch in front of Richard’s face that is down and to the left.
PANEL 2:
This is a close shot of two old guys (late 80’s) of middle eastern decent. They are both dressed in red robes with black trim. They both have hoods but only one is wearing it. The old guy 1 (the one without the hood) is raising an eyebrow
Lighting: The light is coming from torches in front of everyone and far below off screen.
OLD GUY #1: |
You have our attention. Begin. |
PANEL 3:
Richard takes off his hood. There is a torch directly in front of him and to the left. Richard has a very annoyed look on his face.
| RICHARD: | You seem to know more of the story than I would. | RICHARD: | Why don’t you tell me. |
PANEL 4: The old guy is looking angry. This is almost the same picture as panel 2, just with a different expression. The flames from the torch off-screen and far below is barely visible.
OLD GUY #1: |
We do NOT answer to you, Hunter. Tell us how this came to be. |
So thats all we have time for today folks. Next time, we will discuss the finer details in the Comic Script Format. Until then, read some comics from the Marketplace and get inspired!

