
by Matthew Russell - Posted 5 years ago
Welcome my CryptoComics Compatriots. We are here to teach you another step along the way of creating your comic. Learn the penciling basics for your comic and make them your own. Become a master at your craft.
In the past, we talked about all the materials you will need to pencil a comic or all the steps you will take as part of the process. I’ve even given you advice in the past on the Fundamentals of Comic Book Art.
Today we are talking about how to pencil your comic. We will be breaking it down into two main components; traditional and digital. Concerning the digital aspect, there are several different components that you will be able to choose from. I will be sticking with the iPad Pro, and the app Procreate.
There are only three essential things needed for traditional art; paper, pencil, and an eraser. Everything else is just “icing on the cake.”
There are so many different types of pencils; Graphite, Charcoal, Colored, and Mechanical. Let’s break everything down into its most essential attributes.
Graphite pencils: These are the most common ones that you will see in any store. You can either get the typical pencils (Number #2) or get an excellent set starting from 8H to 8B.
As you can see from the image below, H stands for “hard” lead, giving it a lighter quality. B is you “black” or soft.
Charcoal pencils: The pencil version of the Charcoal stick. This is the very first type of pencil in history. If you ever see a cave wall and it has drawings, the chances are it was made from charcoal. They create profound dark lines but are not as versatile as the graphite pencil.
Mechanical Pencils: This is also a very regular pencil type that you can find in any store. I recommend a pencil with blue lead if you’re going traditional with your art. More on this here.
Don’t hold your pencil like you do when you write. This has got to stop. I see it time and time again. Please stop. For your sanity and mine, I’m begging.

Overhand Grip- This is best used when you are trying to layout your drawing and adding a sense of fluidity. Use your elbows and shoulders more when trying this.
Lock your wrist and hold all your fingers on one side and your thumb on the other. This forces us to use our whole arm to make nice smooth lines. This grip is perfect for drawing on a larger scale.
Tripod Grip- This gives you stability when you are trying to add the finer details. Hold your pencil just as if you are writing. Try this when you are trying to add the details of the eyes of intricate designs.
Now, pick your grip, and let’s start drawing.
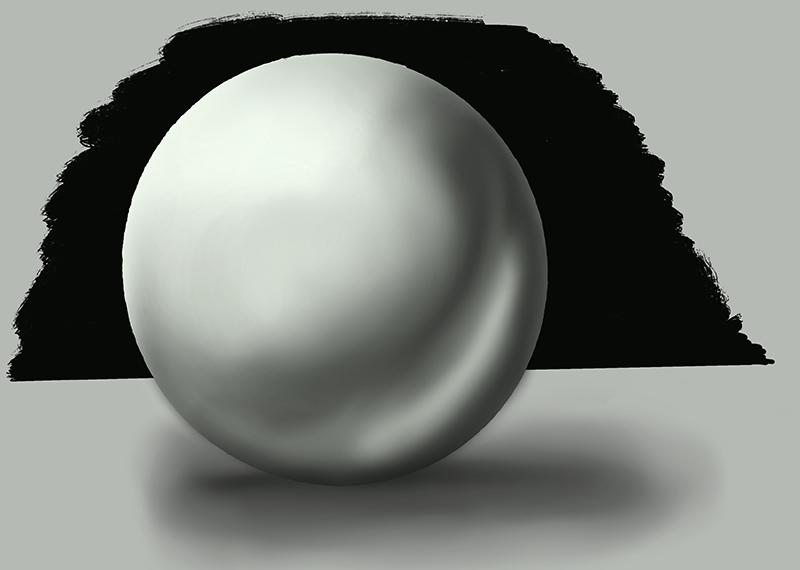
Drawing is merely capturing the light on a form using your pencil. There is nothing more to it. When drawing, we have to keep track of several elements. On every element, there are two main zones; light and shadow. Let’s look at the ball below.

As you can see, the edge where the light transitions from light to shadow is known as the terminator. No, not the Arnold kind. It is located on the edge, where the plane starts to face away from the light.

There are two types of shadow; form shadow and cast shadow. As mentioned above, the form shadow is caused by a plane turning away from the light source.

The cast shadow is caused by 1 form blocking the light onto another form. You can find this shape by drawing an outside line from the light source to the edge of your first form. Continue until it makes contact with the second form.
The form shadow tends to be a smoother edge with more of a gradient. The cast shadow is generally a harder line. Look at your shadow when walking down the street. You will typically see a distinct separation from the cast shadow and the sidewalk.
I have talked about this extensively in the Fundamentals of Comic Book Art Part 5: Color Theory & Light, so I won’t go much further into this here.
Let’s assume that you are familiar enough with drawing and shading that we can move on.
To shade correctly for traditional comic art, we must look at the two most widely used shading forms.
This is the most common type of shading that I’m sure all of your art teachers have taught you over the years. “Where there is a change in direction, there is a change in tone.” That was something my art teacher used to hammer into our heads.

Everything is nice and smooth. Everything has its shade. This will give you a sense of realism. But what about comics?
Old printers used to have a lot of trouble picking up pencil lines. So, we started giving our pencils a little help in the form of inking. The problem with this is that inks are virtually impossible to shade with. They are dark and very flat.
So now we move on to shading with inking. Create close-together lines going along the form to create hatching marks. The more marks, the darker the impression.

Start by drawing your subject’s face. In this example, I am drawing an angry henchman who happens to be bald. Let’s face it, bald is easier to draw. I have the outline in green, and then I have the basic drawing. There are no shadows, just the face. You must figure out what they look like before you start to add shade.
I took the same character and duplicated it, and added a little shadow. This indicates that they are outside on a sunny day. Nothing too bright. They are softly lit from all different directions.
The only prominent shadow is underneath the jawline and the lower lip. There is some extra shadow under the brow ridge to indicate anger or evil intent.

Now I am adding a distinct light source. I have moved them from outside to an indoors setting and controlled the light. This has a more dynamic look. This will help you create an atmosphere in your comics.

I have created a lot more shadows, which allow me to get more expressive with my subject. They look more menacing. I can use more heavy shadows along one side and underside of the face.
For a perfect example of this, look no further than John Romita Jr’s run on Daredevil. I forget what issue it was, but he took over art duties from his famous father. There was a scene where he drew the Kingpin the same way as his father. In three panels, he lit a cigar, and the lighting changes.
The mood changed for the story, and everything was new again, more dangerous, more sinister. It was perfect.
Now that I have decided to finish the piece, you can see the hatching lines giving it a smoother finish. The x’s indicate that this should be taken all the way to black with no shading (basic instructions for the inker). Those instructions will be covered in a future tutorial about the basics of inking.

We will be back with more great comic drawing tips and tricks for you real soon. Until then, please feel free to check out the marketplace and maybe even leave your living journal. Let’s watch your progress as you get better and better. Who knows, you may be the next Todd McFarlane, and we could see you become that right here on CryptoComics.

Take care of each other, and I’ll see you later.

