
by Matthew Russell - Posted 2 years ago
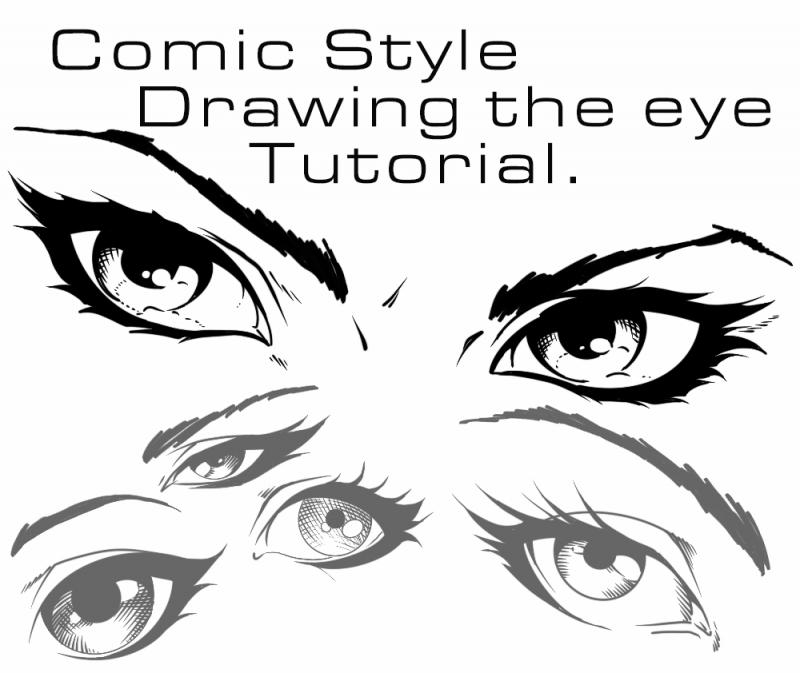
Welcome, aspiring comic artists and doodlers! Today, we're diving into the wonderful world of drawing eyes for your beloved comic book characters. Now, I know what you're thinking: "Eyes? Really? How hard could it be? They're just two circles, right?"
Oh, my friend, if only it were that simple!
Drawing eyes for comics is like choosing the perfect toppings for a pizza. Sure, you can go with the classic cheese, but why stop there when you can add pineapple (yes, I like pineapple on my pizza), bacon, and even a sprinkle of jalapenos? Dang, now I’m hungry.
Drawing eyes is your chance to sprinkle some personality onto your characters, giving them that extra pizzazz they need to leap off the page and into our hearts.
But be warned: eyes are the windows to the soul, and sometimes those windows can be quite stubborn. One moment, you're trying to give your character a fierce, determined look, and the next, they resemble a potato with misplaced Eugene Levy-style eyebrows. We've all been there, trust me.
So, grab your pencils, erasers, and a pinch of humor because we're about to embark on an eye-opening adventure. Get ready to dazzle your readers with eyes so expressive, they'll think your characters are winking directly at them. Remember, if you accidentally draw an eye that looks like it's up to no good, just tell your readers it's a secret agent in disguise. Problem solved!
So, buckle up, my fellow artists, because we're about to enter the dazzling realm of comic book eyes. Prepare to unleash your imagination, make your characters come alive, and most importantly, have a lot of fun along the way. Let's draw those eyes and make the world see what your pen can do!
You can see various previous posts concerning the placement of the eye. You can check out the article “How to Draw the Human Face” if you want to really buckle down on the placement.
I’m going to be completely honest with you when I draw eyes, my fingers are constantly hitting that undo button on my iPad. I will go through about 20-30 variations before I am even remotely happy with it.
Even then, one will look good and the second is janky. I will then take another 10-15 variations trying to get it right. This is why I spent so much time this last month trying to get better. The eyes that you see in this post actually took about 7 or 8 on average as each stage was a separate drawing.
Looking back, I should have just done this as a separate layer since I was using ProCreate.
In compiling the insights shared in this article, I've tapped into a wealth of knowledge and inspiration from various YouTube videos. My personal favorite is "How to Draw Eyes by Christina Lorre" and "How to Draw and Stylize Eyes by Ross Draws" (both shown below).
By delving into their valuable resources and combining their wisdom with my own experiences, I bring you a comprehensive guide to drawing comic book eyes. Remember, learning is a collaborative journey, and I'm here to share the collective wisdom of the art community with you.
As I have said, it takes me forever to draw a single eye. I have then started to really dig into the various tutorials in order to get better. By the time this is released, I will have taken 100 hours of just drawing eyes on a site like Sketch Daily.
Now, let's dive into the exciting world of eye-drawing mastery together!
Eye-yo, (yes, there will be puns) fellow artists! Buckle up and get ready to shape those eyes like a pro in this first step of eye-drawing awesomeness. We're diving deep into the wondrous world of eye shapes and angles that will make your comic characters pop!
Now, picture this: you're staring at a blank canvas, wondering how to capture the perfect eye. Well, my friend, it's all about nailing that overall shape and angle. We're talking about the tilt from the tear duct to where the eyelids meet on the other side.
I've noticed a sneaky upward tilt works like magic, making your characters look oh-so-consistently awesome.
This is the perfect opportunity to unleash your creativity and go wild with eye shapes. Don't settle for ordinary circles when you can unleash a whole circus of shapes!
Narrow eyes, round eyes, eyes pointed to the side – go on, mix it up, and have a blast creating a myriad of eye-popping variations for your comic book characters.
This is not a tutorial on drawing the Manga eye, that is another tutorial entirely. This is based on the Western-style comic book eye, so let's try to keep this more realistic than the manga-wide eye.
I like to start with the bottom and then the top. The 2 lines are almost parallel but not quite. It tends to go up on the outside, with the highest point being about 2/3rds of the way to the outside. This is an almond shape.

Alright, time to dive into the second step of eye-drawing madness! Get ready to unleash the power of the iris and the pupil with a twist of creative mischief!
Now, let's talk proportions; a solid rule of thumb is to make the iris about 1/3 the distance across the eye. Here's the deal: rules are made to be broken, especially in the wild world of comics! When you want to crank up the fear or excitement, go ahead and shrink that iris down.
It's like giving your character a super-sized dose of emotions! And don't worry, in the realm of comics, we can totally get away with it. No judgment here!
But hold your horses, there's more to learn. Take a moment to notice that sweet spot where the iris touches the top eyelid. It's like a secret handshake for a more relaxed eye look.
And guess what? Subtle changes in the position of the iris and pupil can make a world of difference in your character's expression. So, keep your peepers peeled and experiment away!

Remember, we're not just drawing eyes, we're crafting mini-masterpieces bursting with personality and life. So, grab your art supplies and let your creative juices flow! As you can see in the drawings below, moving the iris and pupil can indicate a wide variety of emotions. Can you look at each eye and figure out which emotion goes with each eye?

It's time to conquer those irises and pupils like the artistic superheroes we are. Get ready to dazzle the comic universe with eyes that speak louder than words. Practice some more and then we can move on.
Alrighty, my artistic amigos, hold on to your pencils because we're about to tackle the thrilling third step of eye-drawing magic! Get ready to shape those eyelids like a boss, with a touch of artistic pizzazz!
Now, here's the deal: drawing the eyelid is like giving your eye a snazzy frame. You can totally follow the existing edges, but let's take it up a notch and add a pinch of flair. I like to taper the eyelid a tad taller as it dances around the rounded or middle part of the eye.
Why, you ask? Well, it's all about envisioning the glorious spherical form of the eyeball beneath the skin. We're talking about eyeball magic, people!
But wait, don't stop there! This is your chance to let your style shine. Play around with the eyelid area like a mischievous Picasso, experimenting with different shapes, angles, and whimsical quirks. Find what suits your artistic soul and style the best. After all, in the realm of comics, we're all about expressing our unique flair.

With every stroke, imagine that eyeball, waiting to bring your character to life.
Hold on to your eyelash curlers, my fellow artists, because we're diving headfirst into the fourth step of eye-drawing awesomeness! Get ready to rock those lashes like there's no tomorrow, with a splash of fearless creativity!
Now, here's the secret sauce: I like to draw eyelashes as large basic shapes with big sweeping motions. Why, you ask? Well, it's all about simplifying the process and keeping things comics-friendly, especially when you're dealing with smaller faces within a panel.
We're talking about streamlining the lash action, people! Sure, individual eyelashes are cool for up-close shots, but let's save that for another time.
You have the power to experiment like a mad scientist! This is your chance to play with a variety of lash shapes. Just don’t forget, big sweeping shapes work REALLY REALLY well here. I look to Egyptian eye makeup as a base. I like to add this and just go with it.
So, grab your art supplies and let your imagination run wild! Draw those lashes with confidence, knowing that you can always add in those individual beauties later. This is your chance to shine and create eyelash masterpieces that will make your characters bat their eyes in admiration.

Let's push through the challenges and emerge victorious, one fabulous eyelash at a time!
Hold onto your eyebrow tweezers, folks, because we're diving into the fifth step of eye-drawing magnificence! Get ready to sculpt those brows like a true artistic eyebrow wizard, with a sprinkle of humor and a dash of energy!
Now, here's the brow-lowdown: drawing eyebrows is all about nailing that shape with some basic angles in mind. But hey, let's not forget to tap into our wild imagination and envision the glorious plane changes of our characters' foreheads.
We're talking about sculpting brows that can conquer galaxies, people!
But wait, there's more to this brow-tastic journey. By keeping this step as simple as possible, we're actually laying down the groundwork for those juicy details that'll make your characters' brows pop.
Trust me, I've been there—when you start trying to draw a gazillion little hairs right from the start, you end up with a brow situation messier than a hair salon after a hurricane. And let's face it, nobody likes messy eyebrows, not even our comic book characters!
So, my artistic amigos, grab your pencils, and let's conquer those brows like true eyebrow maestros! Focus on the basic shape, envision those forehead planes, and keep it simple yet sensational.

We're on a mission to create brows that are so on fleek, they'll make Frida Kahlo raise an envious eyebrow. Get ready to unleash those brow-drawing superpowers and give your characters the eyebrow game they deserve. Let's do this, one fabulous arch at a time!
Alrighty, my eye-drawing extraordinaire, get ready to shine some light on the sixth step of this epic eye-drawing adventure! We're about to add that oh-so-sparkling glare and mysterious shadow to our iris, all while keeping the laughs and energy flowing!
Now, here's the scoop: we want our eyes to scream "I'm a spherical marvel, not a boring flat object!" So, to achieve that 3D magic, draw a fabulous curve over the iris as the shadow. It's like giving your eye that extra pop of depth, making it look like it's ready to leap off the page and wink at your readers!
But hold on, we're not done dazzling yet! It's time to bring on the sparkle and pizzazz by drawing in the glare at the highest point of the eye. Picture it, my friends, that gleaming light right by the pupil, like a secret shimmer that adds an extra twinkle to your character's gaze.
This is where you can really let your style choices shine! Play around, experiment, and let your creativity run wild. After all, you already knew this was another chance to rock your artistic choices, didn't you?
So, my talented artists, grab your favorite pencils, and let's ignite those eyes with a touch of magic! Curve that shadow, add that sparkling glare and create mesmerizing eyes that captivate your readers like never before.

Let's dive in and make those eyes shine brighter than a disco ball at a dance-off!
Hold on to your mascara wands, my artistic superstars, because we're about to unleash the seventh step of eye-drawing brilliance! Get ready to bring those shadows to life and add some fabulous eyelashes, all while keeping the laughter and energy soaring!
Now, let's dive into the shadowy depths, shall we? It's time to fill in those shadows and make those eyes pop like fireworks on the Fourth of July. But here's the twist: I'm all about changing things up and playing with the shape of those eyelashes.
It's like giving your characters a whole new lash personality with each stroke of your pencil. Oh, the lash possibilities are endless!
Don’t necessarily get too attached to the individual lashes. The next step will break your heart if you do.
Get your erasers ready because we're about to embark on an eyebrow-raising adventure. You see, sometimes I like to erase back the perimeter shape to try out different effects with those mesmerizing eyelashes. It's like giving your art a VIP pass to the Lash Transformation Convention, where the possibilities are as limitless as the mascara options in a makeup aisle.
And here's a little secret: I have an eye on other comic artists too! I pay attention to how they define this area of their work. It's like being part of an artistic eye-lash secret society, where we share inspiration and ideas that'll take our eye-drawing game to the next level.
So, my talented comrades, keep your peepers peeled, explore, and let the wisdom of other comic artists guide your hand. Check out Chad Hardin’s Twitch account for some great ideas on how to get into the mind of a master.
Now, grab your pencils, and let's fill in those shadows, unleash those lashes, and create eye-catching masterpieces that'll make your characters wink with pride. This is your chance to shine, to experiment, and to draw eyes that'll make the art world go gaga.

Let's make those lashes flutter like butterflies and bring the comic universe to its knees with our lash-tastic talent!
Alright, fellow inking aficionados, get ready to take your comic book eye from good to ink-tastic greatness! We're right in the middle of this thrilling tutorial, so let's dive in and make those eyes pop like never before with our ink-slinging skills!
Now, it's time to unleash your inner ink ninja and add those irresistible details that'll make your eye come alive.
Grab your trusty pen and make sure you turn on another layer (if you are working digitally, and yes, I’ve made this mistake before) carefully outline the shape of the eye, tracing every curve and line with the precision of a ninja throwing star.
Remember, a steady hand and a dash of confidence are your secret weapons here!
If you are going digital, the line tool/pen tool/curve shape (for ProCreate) makes this task SO MUCH EASIER!!! Use these tools for a much smoother line.
But hold on, we're not done yet! Let's add some dramatic depth to our eye by shading in those shadows. This is where the magic happens, my friends. With swift strokes of your inked brush, carefully fill in those shadowed areas, creating a mesmerizing contrast that'll make your eye jump off the page. It's like adding a pinch of mystery and intrigue to your comic world.
Here is a little hint; I will use a thicker brush for the eyebrows and then I will go over it with a white brush for the highlights.
So, my ink-savvy artists, keep that ink flowing and let your creativity soar. With each stroke, feel the adrenaline rush through your veins as you bring your comic book eye to life. Get ready to ink your way to greatness, one eye at a time.

Let's make those inked eyes shine brighter than a supernova in the comic universe!
I know I mentioned the Eugene Levy-style eyebrows and this is exactly what I ended up with, so I had to hit the drawing board and revise that giant fluffy caterpillar. Asa you can see, I streamlined it quite a bit.
This is all done with a single pen. I wasn’t done yet. I had drawn this in another layer and it still didn’t seem to fit. It still looked like Spock when I had finished but don’t worry, there is still another tweak I can do. I brought it into Photoshop to warp it a little, curving the outside down a little more. Here is the final rendering.

And there you have it, my artistic comrades! We've conquered the art of drawing comic book eyes with flair, finesse, and a whole lot of fun! But hold on to your art supplies, because our adventure is far from over. Brace yourselves, because next up, we're diving into the world of luscious lips!
That's right, get ready to pucker up and unleash your lip-drawing superpowers. In our next installment, we'll delve into the mesmerizing realm of both male and female lips.
From the bold and chiseled to the soft and alluring, we'll explore a spectrum of lip styles that'll make your characters smackers the talk of the town.
So, my talented artists, keep those creative juices flowing, because the comic book world eagerly awaits your next stroke of genius. Practice, experiment, and embrace the beauty of both masculine and feminine lip artistry. Get ready to blow kisses to the art gods as we embark on our lip-drawing adventure together.
Since you got this far, Congratulations! The secret code to redeem a special badge on the CryptoComics Dashboard is "EyeMaster".
Remember, my friends, art is a journey of endless possibilities, and with each stroke of your pen, you're creating a universe that's uniquely yours. So, gear up, grab your pencils, and get ready to conquer the world, one magnificent lip at a time! Stay tuned, because the best is yet to come!

