
by Matthew Russell - Posted 5 years ago
Welcome, my CryptoComic Compatriots! I’m back with part 3 of the Fundamentals of Art Series.
If you haven't already, you can read the first two parts of series:
Fundamentals of Comic Book Art Part 1: What are they?
Fundamentals of Comic Book Art Part 2: Construction.
Part 1 explains the why of the fundamentals as a whole and Part 2 focuses on the first fundamental; shapes.
I’ve talked about Perspective in an earlier blog post that you can find here. Vanishing Points Explained. I will be using some of the same images, but I will be expanding on these a great deal, so please don’t think “I read the last one, so I’m a master.” It doesn’t work that way.
Now that we have that out of the way, let’s jump right in.
A 2 second Google search gave me the definition of Perspective as “the art of drawing solid objects on a two-dimensional surface so as to give the right impression of their height, width, depth, and position in relation to each other when viewed from a particular point.”
But, what the hell does that actually mean? To put it simply, it is the art of drawing on a flat surface and giving it depth; making it look 3D. But how you ask. Don’t worry, dear old Uncle M. Scott Russell is here to help.
One of the first things we do in a simple 3D image is think about our Horizon line. How does it relate to our line of vision, where are things popping out from? Keep in mind, sometimes the horizon line is not even on our image.
Have I thoroughly confused you yet? Don’t worry, I’ll explain. Think of the horizon line like this; when you are on a ship in the middle of the ocean. There is no wind, smooth glass-like water, the sun is setting. You look out on the water and see a bird flying, clouds overhead and you feel calm.
Your drawing would be a snapshot of your field of vision. The horizon line is the edge where the ocean meets the sky. It's really that simple.
Now, pick a spot on that horizon line and that is your focal point. Everything above the horizon line; we will be looking at the bottom of it. Everything below it; we will see the top.
Good God, special shout out to Dictonary.com for supplying a million definitions you will see. Here they define a focal point as “the point at which rays or waves meet after reflection or refraction, or the point from which diverging rays or waves appear to proceed.” But once again, what does that mean!?!
Basically when you are looking at the horizon line, everything will spring out from that one point. That point is your focal point. The best way to explain this is by showing dramatic “speed” lines typically used as a quick background in comics to convey movement at a high rate.

You can see via the red, the speed lines all go to the same single point known as the focal point.
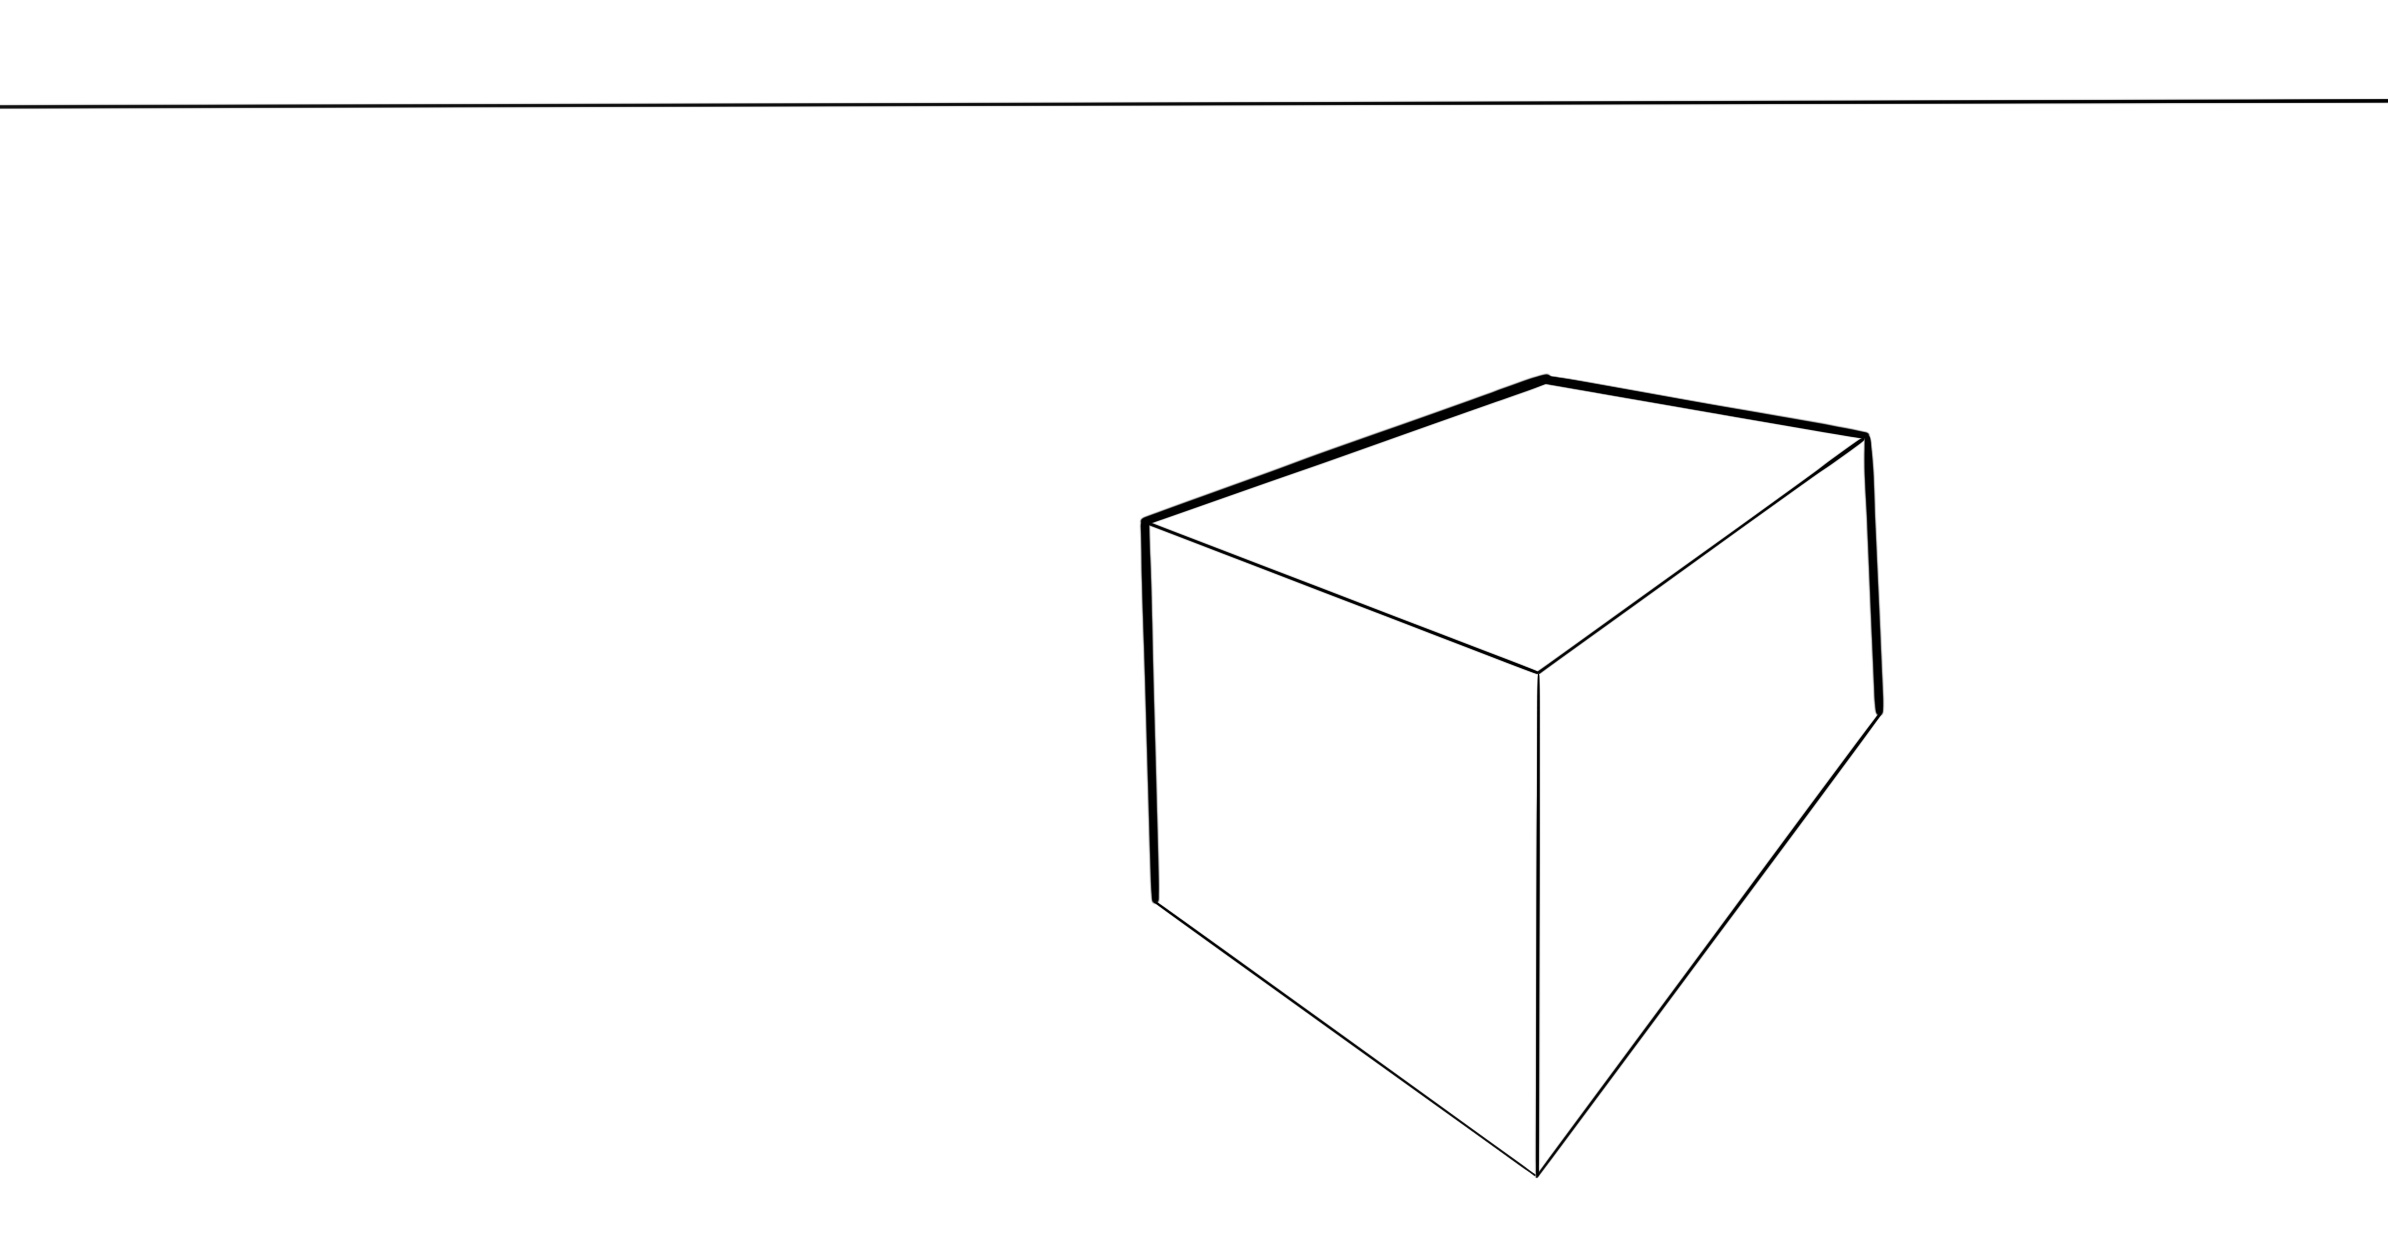
Now, let's draw a box. We are going to keep the speed lines there for future reference.
From each of the 3 outside corners (the bottom right being hidden by the box) draw a line going to the focal point.
Now we have our top and bottom. We have to add the sides. From the bottom corner draw a line up until it makes contact with the line coming from the top left corner. From there make a right angle until it makes contact with the line coming off the top right corner.
So now we have a 3 Dimensional cube. It looks great but it’s still a little flat. In order to fix this, we will have to add some more focal points.

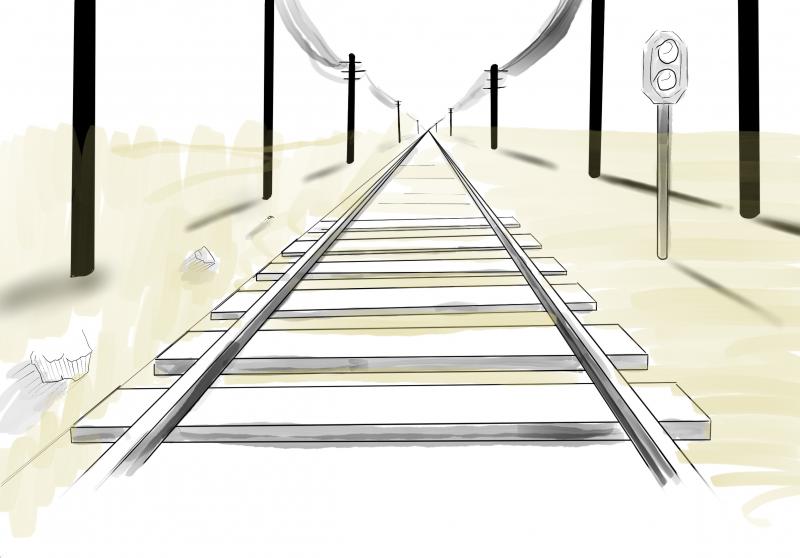
We typically don’t necessarily use this method for actual shapes unless it is coming straight at you perfectly. We also use it for simple backgrounds and landscapes. Think of the drawing of a railroad track. See below, I used the same horizon line and focal point as before.

Now that we have our railroad, what does this mean for people? Well, superheroes are pretty big in comics, so I drew this quick sketch of a hero flying towards us. I have duplicated it and also moved it further into the background, keeping the same ratio.

As you can see, the hero loses definition, gets smaller, and moves towards that focal point.
As I have said before, this technique is great if something is coming straight at you. Let’s take a look at something slightly off to the side.
Now is when things start to get fun. As you can see, we start off with the same horizon line, but the focal point moves off to the side and we added another on the other side.

We start by creating a vertical line. This is the edge of the cube that is closest to us. Create a “V” or triangle connecting the top of the line edge to both focal points.

Repeat this for the bottom of the vertical edge. This gives us both the top and bottom edges of our cube.

Now we have to add 2 more vertical lines making up the outside edges of the cube. I recommend not having the exact same distance between the 3 lines in order to avoid uniformity.
Both new vertical lines should start and stop on the top and bottom horizontal(ish) lines connecting to the center.
I realize that my description of how to create the outside edges sounds off, thankfully we are talking about drawing, so I have a nice pretty picture to explain it better. Pictures are, after all, worth 1,000 words.

Now onto the outside top and bottom. On one side of the top of your new vertical You can see where the tops of the 2 vertical outside lines make contact with the top lines from the perspective points. Draw a straight line to the opposite perspective points as shown below.

As you can see, our box is now complete. If you remember our lesson on inking, you would know to draw the top and outside lines a lot thicker in order to give it some weight.
Holy crap, this part gets hard. Now that we have mastered 2 point perspective. This will seem rather drastic with the cube, but it will make sense when you start applying this to cities from the top and bottom view. We are just starting with the cube so that you can understand the process.
Let’s add a third perspective point. This time, it will be on the bottom.

Next I have created a guideline coming off the bottom perspective point and added top and bottom placement markers. From here I will create my cube. Because they are guidelines, they are in blue. I will finish by going over everything in black later.

I will create the top and bottom the exact same way in the 2 point perspective. Because of this, I am not splitting them into separate steps. I have also added markers to indicate where I want the bottom of the cube sides to be. I keep them relatively close to the centerline, and you will see why soon.

Now it gets interesting. In order to create the sides, I no longer just make a vertical line off of the markers. I have to use the bottom perspective point on the bottom and make contact with the marks, drawing through to the top of the cube.

As you can see, it’s starting to take shape. Just like in the 2 point perspective, complete the top. It is the exact same method so you shouldn’t have any problems if you’ve been practicing.

Now it’s time for cleanup. I am using my blue lines to outline the cube. Remembering the line weights, the outside of the cube is a little thicker.
I

But how does this translate to a cityscape? That's easier than you think (and in some ways harder). Picture each building as a city

As you can see, here is my city block. This process just keeps going in order to do an entire city.

These are my guidelines for the left side.

These are my guidelines for the right side.

These are my guidelines for the center. As you can see, it gets pretty convoluted. Don’t get discouraged. Just handle one building at a time.

Join us next time as we break down the Fundamentals of Comic Book Art: Anatomy. This is a tough one. We will be going over realistic as well as comic book anatomy.
Until then, get some practice in and have some fun. There are always new comics in the Marketplace if you ever indeed a break. CU Then!

